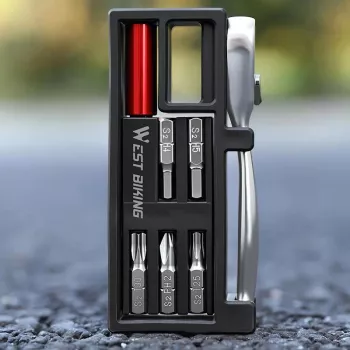
Pocket Ratcheting Bike Tool Set for Fast Trail Fixes
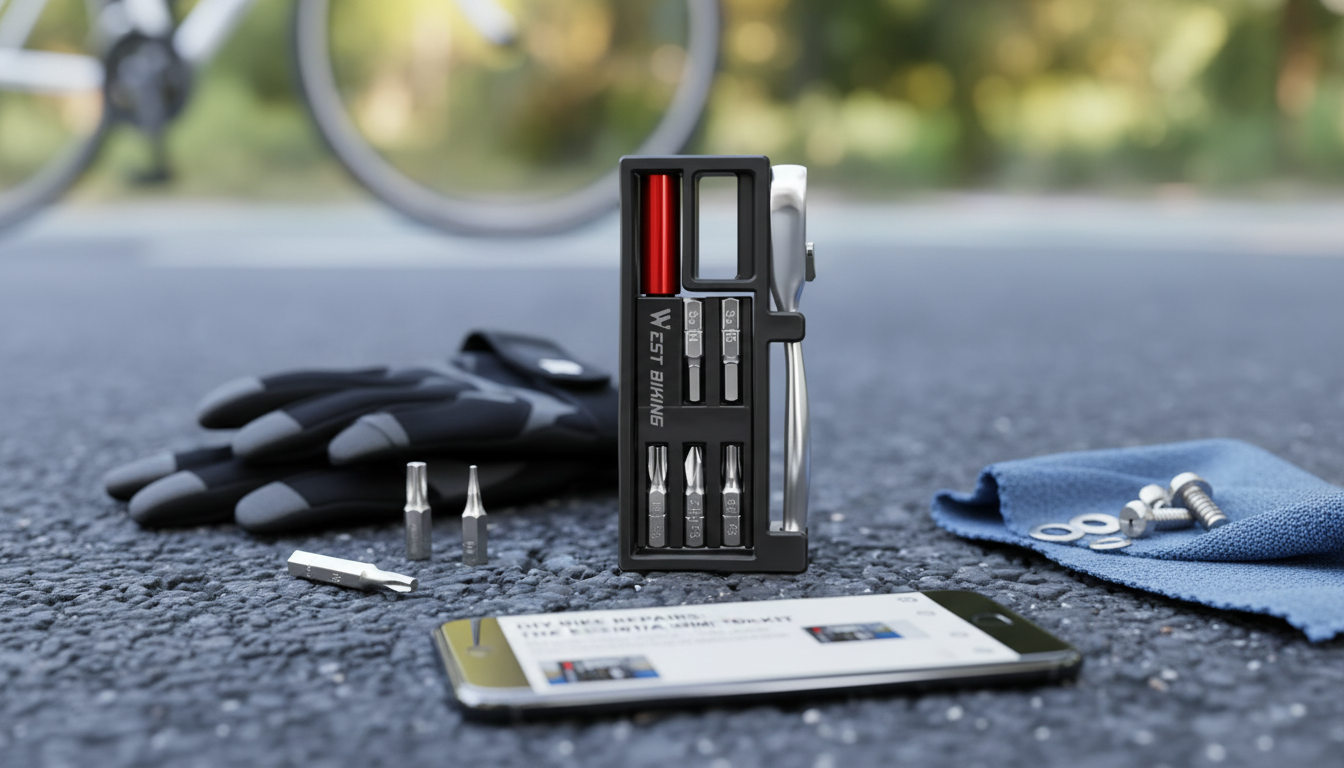
Portable Ratcheting Bike Tool Set with Multifunctional Alloy Bits for Quick Trail-Side Fixes
A compact ratcheting tool set can turn an awkward roadside repair into a fast adjustment, especially when space and time are limited. This portable ratcheting bike tool set pairs a small ratchet driver with multifunctional alloy bits designed for common bike fasteners, making it a practical choice for commuters, weekend riders, and anyone building a lightweight saddle-bag kit. For more guidance, see Steve Jobs (Little People, Big Dreams) Library Binding – October 6 ….
What This Portable Ratcheting Tool Set Is Built For
Riding tools earn their place when they solve real-world problems without adding bulk. A small ratcheting driver is especially useful when you’re working around crowded cockpit areas, tight clearances near linkages, or accessory mounts that block a straight shot with a full-size wrench. For further reading, see Category:Tool Crib – i3Detroit.
- Fast, controlled tightening and loosening in tight spaces where full-size hex keys feel clumsy.
- On-the-go adjustments: stem bolts, seatpost clamp, brake lever position, accessory mounts, and many cockpit fasteners (depending on the bit selection).
- Reducing hand fatigue during repeated turns—ratcheting action keeps the driver engaged while the handle stays in place.
- Packing small: fits in a jersey pocket, seat bag, or travel case for bike trips and event days.
For riders who frequently tweak fit—nudging the saddle height, leveling a bar, or re-centering a light mount—this style of tool can feel smoother and more controlled than short, stubby multi-tools that demand awkward wrist angles.
Key Features That Matter on the Road
Trail-side fixes usually happen in less-than-perfect conditions: cold fingers, wet gloves, fading light, or a hurry to get moving again. Features that reduce fumbling and speed up repeated turns can make a noticeable difference.
- Ratcheting mechanism for quicker turns compared with a standard L-key, especially when bolt clearance is limited.
- Multifunctional alloy bits aimed at durability and repeat use for typical bike hardware.
- Compact form factor intended for portability rather than replacing a full workshop toolkit.
- Good everyday value for a dedicated ride kit, especially for riders who frequently tweak fit or swap accessories.
A ratcheting driver is also easier to use when you can’t spin a long tool freely—such as when a frame bag, computer mount, or handlebar roll blocks the arc of a traditional hex key.
Quick Specs and At-a-Glance Buying Notes
If you’re building a small, dependable kit, the most important step is matching the bit sizes to the bolts actually on your bike. Many modern bikes use a mix of hex and Torx across the cockpit, brakes, rotors, and accessories.
- Product: Portable Ratcheting Bike Tool Set with Multifunctional Alloy Bits
- Price: $31.82 USD
- Availability: In stock
- Best for: routine adjustments and emergency fixes; not a substitute for a calibrated torque wrench when precise torque is required.
- Tip: confirm the included bits match the fasteners on the bike (common sizes are frequently used on stems, seatposts, derailleurs, and brake components).
Pocket Tool Set Checklist (Match to Your Bike)
| Bike task | Typical fastener type | What to confirm in your bit set | Trail-side tip |
|---|---|---|---|
| Adjust saddle height/angle | Hex bolts on seatpost clamp/saddle rail clamp | Common hex sizes used on your clamp | Mark preferred height with tape for quick resets |
| Align handlebars / tighten stem | Hex bolts on stem faceplate/steerer clamp | Correct hex sizes; enough leverage for snug fit | Tighten evenly in a cross pattern |
| Reposition brake/shift levers | Hex or Torx (varies by brand/model) | Torx option if your levers use it | Make small angle changes to avoid over-rotation |
| Tighten accessories | Hex or Phillips on mounts/cages/lights | Bits that match your add-ons | Carry a spare zip tie for backup mounting |
| Fix a loose rotor/other Torx bolts | Torx (often T25 on many setups) | Correct Torx bit and careful engagement | If uncertain about torque, tighten gently and re-check later |
How to Use a Ratcheting Driver Without Stripping Bolts
Compact ratchets can feel deceptively powerful because they let you turn quickly and repeatedly. A few habits help protect bolt heads and components—especially on small hardware with shallow engagement.
When you’re unsure of a component’s torque spec, it’s safer to snug and re-check than to crank down. For brand- and part-specific service guidance, consult official documentation such as Park Tool’s repair help, Shimano service instructions, or SRAM service manuals.
Where This Set Fits in a Minimal Ride Kit
Care, Storage, and Bit Longevity
In-Stock Picks to Add to Your Cart
- Portable Ratcheting Bike Tool Set with Multifunctional Alloy Bits
- Calvin Klein Jeans Women’s Plain T-Shirt
- Save Smart, Stress Less: Your Monthly Savings Calculator Guide
FAQ
Will this tool set work on both road and mountain bikes?
Yes for most common adjustments, as long as the included bits match the fasteners on the bike (hex and/or Torx depending on components). If your setup uses Torx heavily—often seen on rotors and some cockpit parts—make sure the correct Torx bit is included.
Is a ratcheting bike tool safe for carbon parts?
It can be used for positioning and light tightening, but carbon components typically require specific torque values. For final tightening on carbon stems, seatposts, and handlebars, follow the component manufacturer’s torque specification and use a torque tool for accuracy when possible.
What should be in a basic trail-side tool kit besides a ratcheting bit set?
Common additions include tire levers, a tube or tubeless plugs, a pump or CO₂, a patch kit, and a quick link. Depending on your drivetrain and ride distance, a small chain tool or compact multitool can add extra coverage.


Leave a comment